English


How to Test a Optical Transceiver?
After installing an optical transceiver, testing its performance is critical to ensure stable network transmission. Many engineers ask: How to test an optical transceiver correctly? What are transmitter and receiver test items? What tools are needed? This article explains the full test process, key indicators, and standards to ensure your module meets professional requirements.
There are four steps in testing an optical transceiver (As shown in the following picture), which mainly includes the transmitter testing and receiver testing.
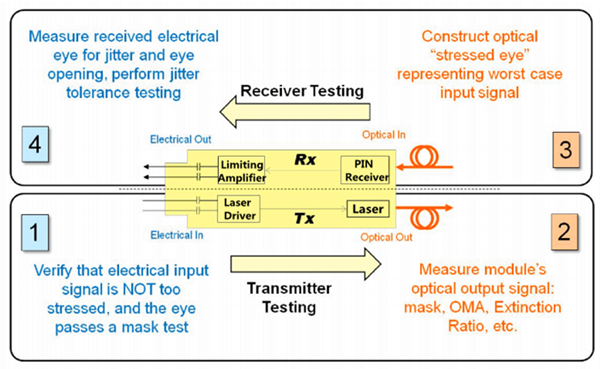
I. What Are the 4 Core Steps to Test an Optical Transceiver?
1. Measure received electrical eye for jitter and eye opening.
2. Construct optical "stressed eye" representing worst case input signal.
3. Perform jitter tolerance testing.
4. Complete transmitter and receiver verification.
The complete test flow is: Electrical Signal Input → Transmitter Test → Optical Signal Transmission → Receiver Test → Electrical Output Verify. All steps ensure the module meets IEEE and MSA standards.
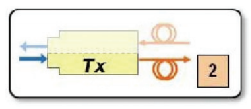
II. How to Test the Transmitter (Tx) of Optical Transceiver?
1. The input signal used to test the transmitter must be good enough. And also need to confirm the quality of electrical measurement by jitter measurement and eye diagram measurement. Eye diagram measurements are common ways to check transmitter output waveform, because eye diagram contains abundant information, can reflect the overall performance of the transmitter.
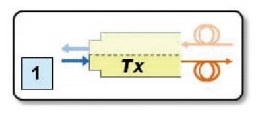
2. The optical output of the transmitter must be tested using several optical quality metrics such as eye diagram test, OMA (optical modulation amplitude), and Extinction Ratio.
Key Transmitter Test Items:
1) Optical Eye Diagram: Check waveform quality, ensure eye is open and passes mask test
2) Optical Modulation Amplitude (OMA): Evaluate optical signal strength
3) Extinction Ratio: Measure contrast between “1” and “0” levels
4) Tx Optical Power: Verify output power within normal range
5) Center Wavelength: Ensure wavelength matches specification
6) Jitter Test: Ensure signal stability and low distortion
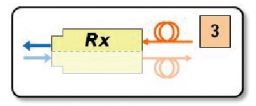
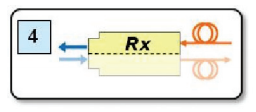
Key Receiver Test Items:
1) Receiver Sensitivity: Minimum optical power to achieve BER ≤ 10⁻¹²
2) Stressed Eye Test: Simulate worst-case signal for reliability
3) Bit Error Rate (BER): Ensure error-free transmission
4) Received Optical Power Range: Verify overload and sensitivity thresholds
5) Jitter Tolerance: Test ability to resist signal jitter
IV. What Test Equipment Is Needed?
Professional test requires these instruments:
1. Bit Error Rate Tester (BERT): Generate PRBS test signal and measure BER
2. High-Speed Oscilloscope: Test eye diagram, jitter, waveform
3. Optical Power Meter: Measure Tx/Rx optical power
4. Optical Attenuator: Simulate fiber loss for sensitivity test
5. Fiber Cleaning Tools: Ensure clean connectors to avoid test errors
V. What Standards Are Optical Transceiver Tests Based On?
All tests follow international standards to ensure compatibility and reliability:
IEEE 802.3: Ethernet transceiver specifications
SFF-8472: DDM/DOM digital diagnostic monitoring
ITU-T G.957/G.959.1: Optical interface parameters
MSA (Multi-Source Agreement): Mechanical and electrical compatibility
All in all, testing a optical transceiver is a complex job, but it is an indispensable step to ensure its performance. Standard optical transceiver testing includes transmitter performance test and receiver performance test, covering eye diagram, jitter, OMA, extinction ratio, sensitivity, and BER.
ETU-Link Technology Co., Ltd provides all kinds of transceivers, which can be compatible with many brands, such as Cisco, HUAWEI, ZTE, Allied Telesis, HP, Brocade, DELL, Juniper.
In ETU-Link, each transceiver will be tested to ensure our customers to receive the products with superior quality.
Last updated: May 27, 2026
Categories
New Blog
Tags
For inquiries about our products or pricelist, please leave your information with us and we will be in touch with in 24 hours.


 Factory: Right Side Of 3rd Floor, No. 102 Building, Longguan Expressway, Dalang Street, Longhua District, Shenzhen
Office: Floor 4, Building 4, Nanshan Yungu Phase ll, Taoyuan Community, XiliStreet,Nanshan District, Shenzhen
© Copyright: 2026 ETU-Link Technology CO ., LTD All Rights Reserved.

IPv6 network supported
Friendly Links:
易天官网